Shopping Cart
0 item(s) - $0.00DIY Buck LM2596 CC/CV Li-Ion Charger / LED Power Supply
Availability: 9
Add to Compare
This is a very flexible and adaptable charging solution at a budget price. It can charge pretty much any size lithium ion cell to almost any voltage you need using almost whatever current you need. You can also use it to power and bench test your LEDs. This is an inexpensive way to charge those 4.30v and 4.35v cells, as well as LiFePo and many other cells that require different termination voltages. It is also a good way to charge smaller cells since you can almost infinitely adjust the charging current.
Both constant current and constant voltage values can be independently adjusted.
You need a few additional things to make this work:
- Have read the instructions. Because this is fully adjustable, you could potentially overcharge your batteries resulting in venting, fire, or explosion. You should always double check settings before use. You can also blow your LED if you are not careful.
- A multi-meter capable of reading both voltage and DC current. You will need this to adjust the board and to verify battery charge levels or LED current.
- A DC power supply that is at least 2V more than your output voltage. For most lithium ion cells this means that you need a 7V+ DC source to power the board. The rated maximum is 35V input. Old laptop power supplies work great for this board.
- A way to hook up your cells / LEDs. This can be via alligator clips, magnets, holders, or however you see fit.
Specifications:
- Input Voltage: 5-35V
- Input Voltage Must Be At Least 2V Above Output Voltage
- Output Voltage: 1.25-30V (infinitely adjustable)
- Constant Current Range: 0-3A (infinitely adjustable)
- Maximum Output Wattage: 15 watts (without external heatsync)
- Dimensions: 49mm x 23.4mm

Instructions for CC/CV Battery Charging:
- Verify the voltage and current of the cell you plan on charging. Do not guess if you do not know the exact specifications. Do not use without a reliable multi-meter.
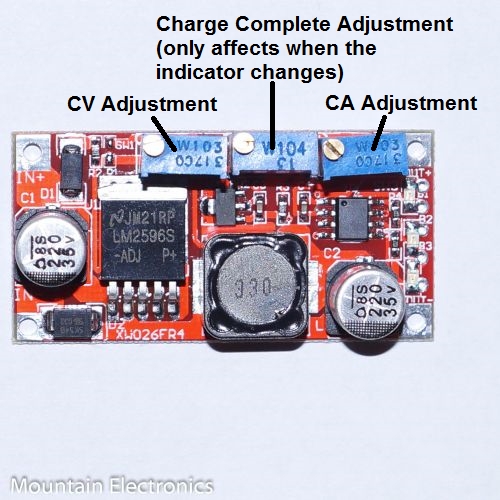
- Adjust CV voltage. Using your multi-meter to read the output voltage, adjust the voltage potentiometer until it is at your desired charge end voltage.
- Adjust charge indicator lamp point (not necessary to adjust for proper function). To adjust it, using your multi-meter in current measurement mode, adjust the CC current potentiometer until it reads approximately 0.1 times your desired charge current (i.e. if your CC charge current is going to be 1A, adjust the CC current to 0.1A). Now, with the multi-meter leads still hooked up, adjust the charge lamp potentiometer until it is right on the edge of being lit up. This is a good rough starting point.
- Adjust CC current. Using your multi-meter now on DC current measurement mode, adjust the potentiometer until it is at your desired maximum charge current.
- Monitor cell throughout charging process to verify that everything is working as expected. If cells feel hot to the touch, terminate charging immediately! Do not leave charging cells unattended.
Here is one example of how you could set up your own board. The board is secured by thermal compound to the bottom of a small container. It is powered by a 12V laptop power adapter. Because of its extremely small size it can fit into many different locations.

Write a review
Your Name:Your Review: Note: HTML is not translated!
Rating: Bad Good
Enter the code in the box below:
Mountain Electronics LLC International Store © 2024


